Description
The recipe for squeaky curds is quite straightforward. You don’t need any special cooking skills, nor unusual equipment. Everything you need is available in the nearest grocery store, or maybe even in your fridge already.
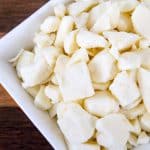
As the curds are best when served and eaten right away, they don’t need to go through aging, nor waxing.
Ingredients
- 1 gallon of milk;
- ½ pack mesophilic culture OR 1/4 cup kefir or cultured buttermilk;
- ¼ teaspoon liquid rennet (single-strength, vegetarian, or crushed) dissolved in 2 tablespoons water;
- ¼ teaspoon calcium chloride dissolved in 2 tablespoons water;
- 1 tablespoon of non-iodized salt.
Equipment
- Two pots with lids. One should be bigger, so the other can easily fit in it;
- Thermometer;
- Stirring spoon or ladle;
- Long knife;
- Colander that fits the small pot;
- A clean cloth or muslin;
- Two clean ziplock bags for storing.
Instructions
There are 8 simple steps you need to follow to prepare the perfect squeaky curd. Let’s dive into it.
1. Heat the Milk
The first step is quite simple: you need to heat the milk to a temperature of some 95F. Use the thermometer for this and try not to let the temperature go below 90F or over 96F. Once your milk hits the desired heat, set the timer for 90 minutes.
2. Stir in Calcium Chloride and Mesophilic (or Other) Starter Culture
Add half-a-teaspoon Calcium Chloride and half-a-pack mesophilic culture. 1/4 cup other starter culture. Don’t let the milk temperature fall down and let it sit for 30 minutes.
3. Add Rennet
Take your desired rennet and dissolve ¼ teaspoon in 2 tablespoons water. Add it to milk and stir continuously for at least 30 seconds.
Give it another 10 minutes and you’ll be able to see how milk is becoming more gelly. In half-an-hour, you should see the curd forming. Take the knife and check its firmness. If you form a cut on the curd, it should fill with whey. If it doesn’t, wait a bit more – up to 15 minutes.
4. Cut the Curd
Since your curd will probably be in one piece, you should cut its surface into cubes. Leave it for 5 minutes before you start to stir. Don’t let the milk temperature fall below 90F, keep measuring it as you stir. After a couple of minutes, the curds should start shrinking.
5. Cook the Curds
The next step is cooking the curds at 115F for half-an-hour. As they boil, they’ll release more whey and shrink further. Don’t stop the stirring: use the ladle every 5 minutes.
The longer you cook them the drier they get, so you need to decide when to stop according to your taste. However, don’t cross 1 full hour.
6. Draining and Pressing
Use the cloth to incase the colander. Pour the curds inside, gather the cloth’s corners and leave it to hang for 30 minutes top. When the time is up, twist the muslin tightly to bring the curds together. Place some 8lbs weight on top of it and leave for 30 minutes.
7. Breaking and Salting
After half-an-hour, the curds should have formed a single mass. Break them with your fingers into pieces sized according to your preference and sprinkle some salt.
8. Storing
Store the curds in clean ziplock bags and put them in the fridge. They should be good for 5 days tops, although they’re best if you eat them right away.
- Prep Time: 2 hours
- Category: Cheese