My Fermented Foods

Simple Cultured Recipes

  • Recipes
  • Wellbeing
  • Beauty
  • Buying Guides
  • Tools
  • FAQ
  • SHOP
  • Private Community

Published June 19, 2018 Updated June 15, 2019 By Gigi Mitts 3 Comments

How to Grow Your Own Kombucha SCOBY

Disclosure: This post may contain affiliate links. I receive a small commission at no cost to you when you make a purchase using my link.

How to Grow Your Own Kombucha SCOBY
Jump to Recipe

In many instances you can get SCOBY of a friend or a family member or purchase it online from a reputable retailer. You can also grow a SCOBY from a bottle of commercial raw kombucha at your home. Growing your own SCOBY is not a fast process however, it is relatively simple.

Have you tried to grow your own SCOBY?

Print
clock clock iconcutlery cutlery iconflag flag iconfolder folder iconinstagram instagram iconpinterest pinterest iconfacebook facebook iconprint print iconsquares squares iconheart heart iconheart solid heart solid icon
kombucha scoby

Kombucha SCOBY Recipe


5 Stars 4 Stars 3 Stars 2 Stars 1 Star

No reviews

  • Author: Gigi M
  • Total Time: 10 minutes
  • Yield: Makes 1 Kombucha SCOBY 1x
Print Recipe
Pin Recipe

Description

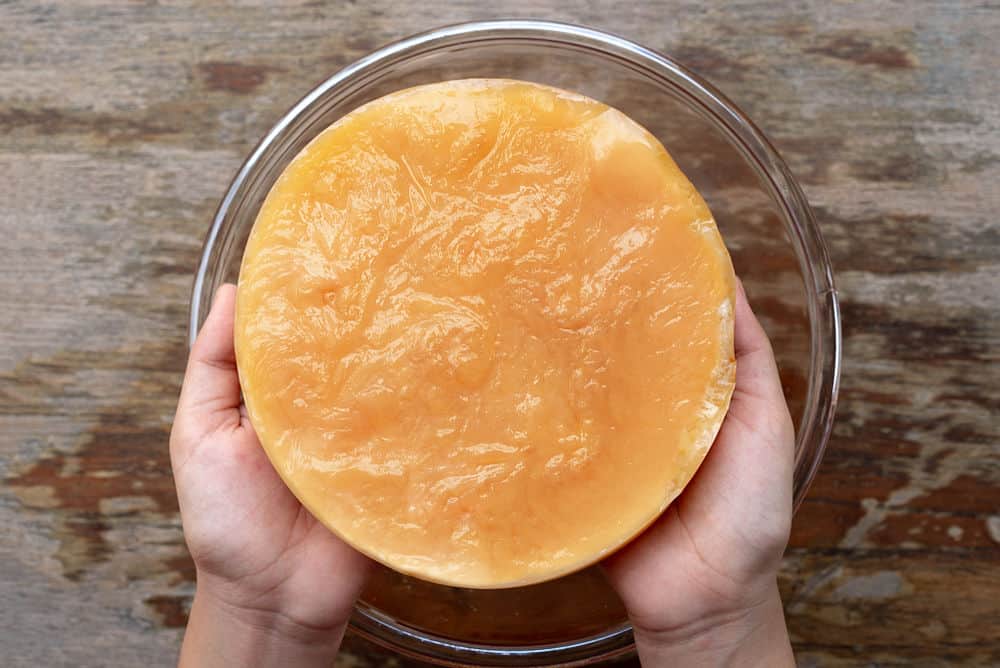
Kombucha SCOBY is a starter culture which is necessary for brewing kombucha. SCOBY (Symbiotic Culture of Bacteria and Yeast) is a combination of bacteria and yeast existing in a symbiotic relationship.


Ingredients

Scale
  • 250ml of original raw commercially brewed kombucha
  • 250ml of filtered water
  • 1 bag of organic black tea
  • 2 teaspoons of raw (organic) white sugar

Instructions

  1. Make a cup of organic black tea and add 2 spoons of raw (organic) white sugar. Stir the sugar with a wooden spoon until the sugar dissolves completely. Let the tea cool down on the room temperature.
  2. In a glass jar pour the bottle of kombucha and the cup of black tea. Stir the contents with a wooden spoon.
  3. Cover the jar with a cheesecloth or tea towel. Secure the covering with a rubber band.
  4. Leave the jar on the countertop on the room temperature for a week before having a sneak peak.
  5. After the first week you will notice SCOBY looks like a clear film or blob then slowly becomes less translucent and gets thicker as time goes on. Wait until SCOBY is around 1/4-inch thick before using it to brew the kombucha tea.

Notes

Equipment: glass jar, wooden spoon, cheesecloth or tea towel, and rubber band

*If you do not see any signs of SCOBY development after the first three weeks we suggest you discard the batch and start over again. While the SCOBY is growing watch for any mold. If mold develops, discard the batch and start the process all over again.

  • Prep Time: 10 minutes

Did you make this recipe?

Tag @myfermentedfoods on Instagram and hashtag it #myfermentedfoods

Filed Under: Recipes

Author

Gigi Mitts
Hi! I’m Gigi. A fermentation nerd passionate about healthy food and great diet. I believe that our wellbeing and beauty starts in our gut and that each of us has a responsibility to get informed, take action, and look after their body. I’m here to spread that message, bring back the benefits of ancient nutrition to modern life, and show you all the latest cool ways to ferment and preserve food at home.

Comments

  1. Jenny says

    December 25, 2018 at 10:06 pm

    This is interesting. I’m going to try making my scoby.
    My kombucha addiction is hurting my pocket!

    Reply
  2. Gary says

    June 23, 2020 at 1:23 pm

    Did you really mean 5 cm thick? Is that a typo or is a 2-inch thick SCOBY what I should be shooting for?

    Reply
    • Gigi Mitts says

      June 23, 2020 at 9:24 pm

      Sorry Gary, that was a typo which I’ve corrected now. It meant to read 0.5cm or approx 1/4 inch.

      Reply

Leave a Reply Cancel reply

Your email address will not be published. Required fields are marked *

Recipe rating 5 Stars 4 Stars 3 Stars 2 Stars 1 Star

A word from the Founder

Hey, Gigi here. I developed an interest in fermented foods a couple of years ago when I recalled that my mum used to make it when I was a kid. Once I rediscovered the world of fermenting, I started reading about and making the food myself. Here at MyFermentedFoods.com I blog about my journey and share my knowledge with you. I hope you enjoy reading it. Read More…

Connect With Us

  • Facebook
  • Pinterest
  • Twitter

Recent Posts

  • Cheese Sauce: Easy Homemade Recipe
  • Fermented Cauliflower Recipe
  • Clabbered Milk Recipe
  • 6 Fermented Milk Products
  • Cheese Cultures: Mesophilic & Thermophilic

Recent Comments

  • Freyda Black on Brine Calculator – Brine Salt to Water Ratio
  • cindy3539 on How to Make Tepache [Fermented Pineapple]
  • Ahmad on Clabbered Milk Recipe
  • Sandra Lindemann Summers on How to Second Ferment and Flavor Milk Kefir
  • Bailey on How to Second Ferment and Flavor Milk Kefir

Resources

  • Best Fermentation Books
  • Best Kombucha Books

Disclosure

MyFermentedFoods.com is a participant in the Amazon Services LLC Associates Program, an affiliate advertising program designed to provide a means for sites to earn advertising fees by advertising and linking to Amazon.com.


Links to products may contain affiliate links. If you make a purchase after clicking a link, we may receive a commission. This commission comes at no charge to you.

  • About
  • Our Team
  • Careers
  • Contact
  • Partners
  • Privacy Policy
  • Disclaimer

© 2025 My Fermented Foods

10+ Fermented Food Recipes to Try at Home TODAY

Sign up now to get these awesome recipes to your inbox.

Recipes guide

Newsletter Pop Up